W2/1099 Printing Scheduled
This year with multiple locations we are handing the printing of 1099s and W2s a little differently. We will begin printing once the 1st district closes payroll or accounting. District that utilize either NEOnet Heartland or LGCA as their “home” location we begin delivering the printed W2/1099 on January 12th and every Friday thereafter in addition to January 30th. For eFP Districts in the northeast region we will ask you where you would like to pick-up your forms, either at NEOnet Main or LGCA Offices. Regardless of where you’ll be picking up your W2s and 1099s you will receive an email telling you when they are available for pickup. Please do not go to any of the offices until you have been notified they are ready for pickup.
Delivery Schedule to NEOnet Heartland and LGCA
- Friday, January 12
- Friday, January 19
- Friday, January 26
- Tuesday, January 30
W2 related updates for USPS
With W2 season right around the corner, we wanted to briefly review some of the W2 related updates the SSDT development team completed during the year to help prepare you for your W2 processing.
- 6.85.0 Release: Fixed CCA RS Record: Non-Ohio records should now include blanks for the account number.
- 6.92.0 Release: A new option to truncate SSN on the W2 Forms and XML output was added to the W2 Configuration.
- 6.97.0 Release: Evaluated all Box 12 items on the W2 form to check for possible negative values. W2 processing now prevents any negative value in Box 12 (will be set to zero).
- 6.98.0 Release: Improved the W2 printed overflow forms to not print unnecessary data on fields 1-6 and 7-12d. Additional locality wages and income tax will only be printed.
- 6.99.0 Release: Corrected an issue with an Employee Name containing a suffix. It was not being included on the W2 form and report. This was resolved.
Also, throughout the year, the SSDT development team has added a new W2 Corrections interface in USPS! All available W2C options are located under the Reports>W2 Corrections menu. Currently, the W2C option allows W2C forms, reports, and submission files to be generated. SSDT still has some additional Jira issues to complete for W2C before the end of the year and their support team has been documenting the new feature as it progresses.

Vendor Adjustments in USAS
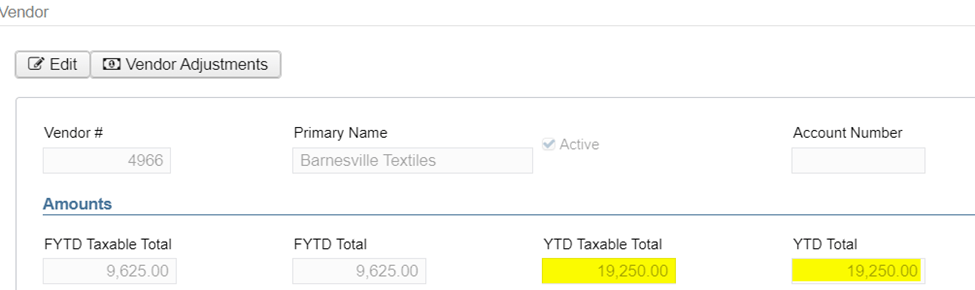
In order to help prepare yourselves for 1099 season, we recommend reviewing and verifying the vendor data for those who will be receiving a 1099 for 2023. The 1099 program will use the vendor’s YTD Taxable Total to report on the appropriate 1099 form.
The most common reason the YTD Taxable Total may need adjusted is due to a voided check that was issued in a prior fiscal year. For example, if you issued a check in February 2023 and voided/re-issued the check in November 2023 (using our procedure ‘voiding a check from a prior fiscal year’), the original check was reconciled (as if it had cleared the bank) and the money receipted into the fund used for the expenditure using a 5300 receipt code (refund of a prior year’s expenditure). When re-issuing the check, a refund of receipt (with check) was created from the 5300 receipt account. Because you reconciled the original check, the vendor’s YTD figure for 1099 purposes wasn’t reduced causing the YTD Taxable Total amount to be doubled when the re-issue was made. Once you confirm the YTD Taxable amount needs to be adjusted, you have two options to update it:
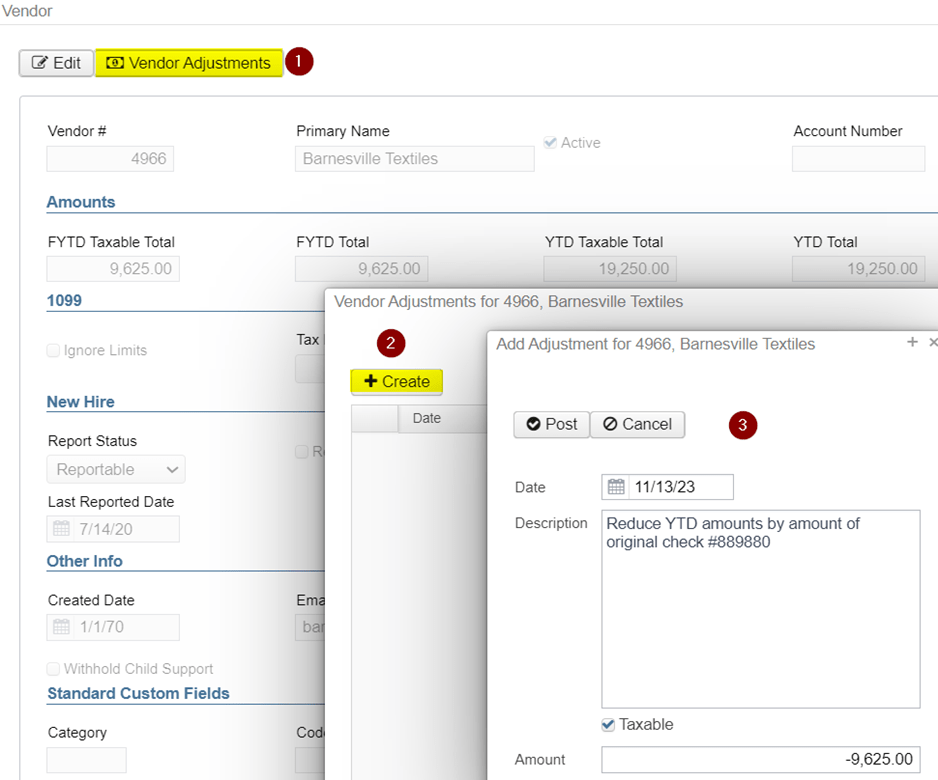
Manually enter a Vendor Adjustment
- Access Core>Vendors grid and filter for the specific vendor record. View the record.
- Select the Vendor Adjustments option at the top of the vendor window and click ‘Create’.
- By default, the ‘Taxable’ checkbox will be marked. Enter the date, description (optional) and, for this example, a negative amount to decrease both the YTD Taxable Total and YTD Total amounts on the vendor. (NOTE: If ‘Taxable’ is unchecked, only the YTD Total amount would be updated, and the vendor adjustment will not be included on the 1099 form.) Post the adjustment.
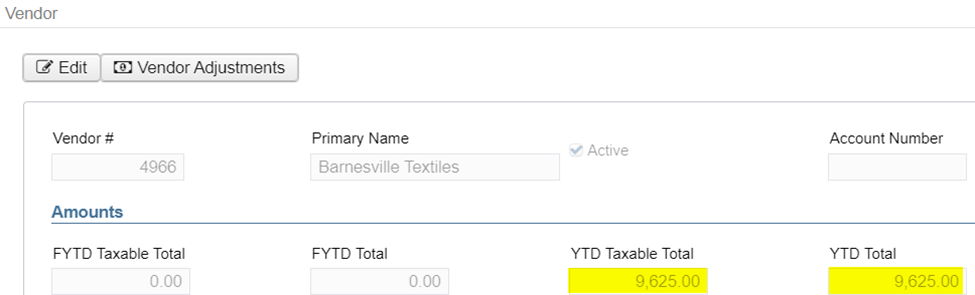
Once posted, exit out of the Vendor Adjustments window and review the YTD amounts on the vendor record to ensure both the YTD Taxable Total and YTD Total have been decreased.
- The above steps on ‘how to adjust the vendor YTD amount’ are also provided in the USAS FAQ chapter in the wiki.
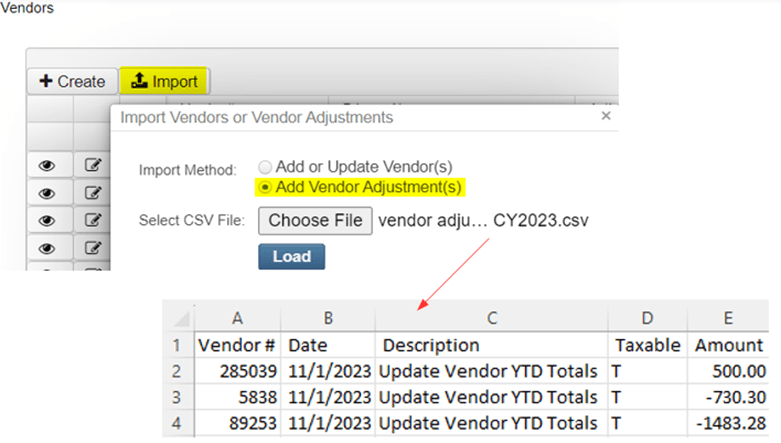
Mass Import Vendor Adjustments
- If you have a need to update several 1099 vendors’ YTD amounts, instead of manually entering vendor adjustments via the Vendor grid, you may elect to mass import vendor adjustments via a CSV file. Please refer to the ‘Add Vendor Adjustments Criteria’ section in the Vendors chapter for more details. A template spreadsheet is provided in the chapter with the proper format needed to mass import vendor adjustments. Once your spreadsheet is ready, upload into Core>Vendors using the ‘Import’ option, ensuring ‘Add Vendor Adjustment(s)’ is selected and click Load.
How to Use the Employee Verification Feature within eFinancePLUS: A Step-by-Step Guide
Generate Employee Verification File
- Navigate: Human Resources > Periodic Routines > Periodic Processing > Employee Verification
- Enter Details: Enter Employee Number(s) and/or Hire Date to tailor your report or leave both fields blank to verify all employees.
- Choose Report Type:
- a. Hard Copy to Review the Data
- b. Electronic File to generate a file for submission to the SSA.
- Requestor ID: Enter the first 4 characters of your Requestor ID. Unsure? Use “OEVS.”
- Generate File: Click the blue check mark to generate the file.
- Print Dialog: Click Ok on the Print Dialog Screen.
- Access File: Navigate to e-Forms & Tools > View Files.
- File Name: Enter “EVSERQ2K.txt” in the File Mask field.
- Process Search: Click the Blue Check mark to process the search.
- Select and Save: Choose the file and click Save to PC, securing the txt file in a safe location.
Submit file to the Social Security Administration
- Navigate to the Social Security Administration’s (SSA) Business Services Online (BSO) website. https://www.ssa.gov/bso
- Click Login
- Follow the website’s prompts to login to your SSA Account
- Choose the option for SSNVS (Social Security Number Verification Service)
- If you do not currently have this option available, you will need to request access using the SSA’s BSO website. They will then mail you a code to confirm access.
- Follow the prompts to upload and verify your entity’s names and Social Security Numbers.
- If the SSA advises of discrepancies, verify with the employee, and update eFP appropriately.
Trainings/Meetings in December